Zoom Accessibility
Keyboard shortcuts for Zoom
See the list of Zoom keyboard shortcuts that you can use on the Zoom Desktop Client for Windows and Mac. Keyboard shortcuts allow you to navigate the Zoom settings without using your mouse.
Captions
At ASU, all online events at a minimum must be auto-captioned. Recordings of live events must have edited auto-captions or manual (human-generated) captions. See the ASU video captioning guidelines for more information on accessibility requirements.
(Please note: In Zoom, captions are sometimes also referred to as live transcripts, audio transcripts or subtitles.)
Auto-captions for live Zoom events
Participants
To enable captions (Zoom live transcripts), click on the Show Captions button  in the Zoom toolbar.
Hosts
At ASU, all Zoom events already have live automatic captions enabled. Hosts do not have to do anything to provide live auto-captions for their participants.
Please note: Students who are deaf or hard of hearing and registered with the Student Accessibility and Inclusive Learning Services (SAILS) are eligible for accommodations beyond automatic live transcription. The student or SAILS will notify the instructor, and SAILS will arrange for a live CART provider to attend scheduled Zoom session(s). It is the instructor's responsibility to coordinate necessary access to Zoom with SAILS.
Recordings: edit Zoom auto-captions
If you want to post a recording of a Zoom event on an ASU site, course, social media account, or other ASU-affiliated platform, you must edit the auto-captions for accuracy before publishing.
When you select the Record button in Zoom, you are given the option of saving the recording to your computer or the cloud (i.e., to your Zoom account on asu.zoom.us). Depending on the option you selected, see the instructions below for editing auto-captions.
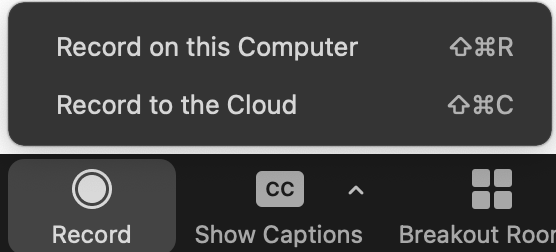
If you saved a recording to the Cloud
If you saved the Zoom recording to the Cloud, the live transcripts (captions) will automatically be saved as an "Audio transcript" file in your account. In addition, Zoom will auto-caption your recording a second time and save the file as a "Closed Captions" file (these tend to be more readable).
To edit Zoom auto-captions:
- Sign into your Zoom account, and go to Recordings > Cloud Recordings.
- Find your event, and play the video.
- An "Audio Transcript" pane will be displayed beside the video.
- Hover over the text you want to edit, then begin editing.
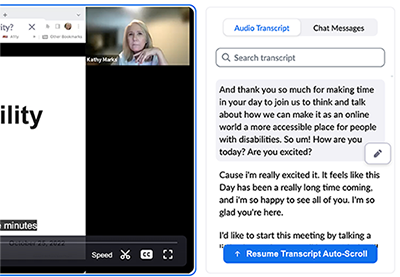
See more on How to edit a Zoom audio transcript.
If you saved a recording to your computer
If you save the recording to your computer, follow these steps to generate an auto-caption file:
- At the start of your meeting: Select the arrow next to the Show Captions button in the Zoom toolbar and choose "View full transcript." A "Transcript" pane will open beside the video.
- At the end of your meeting: Select the "Save Transcript" button at the bottom of the Transcript pane.
To edit the auto-captions, you can either:
- Open the closed captions (.VTT) file in a plain text editor like TextEdit (Mac) or Notepad++ (Windows) and edit there.
- Upload the video and closed captions (.VTT) file and edit them in a:
Please note: In ASU's MediaPlus, you can upload edited auto-caption (.VTT) files. MediaPlus will auto-caption video for you, but you must download the .VTT file to edit it. Editing within MediaPlus is coming soon.
Zoom accessibility best practices
- Ask participants to enable their video, especially while speaking, to help people who lip read.
- Encourage speakers to describe visual images and any action for people who can't see the screen.
Accommodations and Zoom
If a student, employee or member of the public requests an accommodation, the following links may help you get started:
American Sign Language (ASL) interpreter
Communication Access Realtime Translation (CART)
- How to start manual captioning in Zoom Meetings
- Assign a participant to type closed captions
- Using a third-party closed captioning service